Index
- Introduction
1.1 Thanks
1.2 Prerequisites
1.3 Initial Setup
- Python
2.1 Install Python
2.2 Install Pipenv
- Creating the Project
3.1 Installing a local python environment in the project
- Pytest
4.1 Running Pytest
4.2 Pytest Conventions
- Selenium WebDriver
5.1 Selenium WebDriver Conventions
5.2 Installing Chromedriver on Windows
5.3 Installing selenium package for python
- Page Objects
7.1 Page Objects Conventions
7.2 Before Page Objects
7.3 Declaring Page Objects
- Finding Locators for Elements
8.1 Identifying the elements
8.2 Locator Structures
8.3 Declaring the locators in python
- WebDriver Calls
9.1 Asterisk as an argument on Find Element
9.2 Implementation
- Repository
10.1 README.md
10.2 .gitignore
- Conclusion
11.1 Saved for later
1. Introduction
I’ve made this tutorial to learn more about test automation in python for web applications.
In this tutorial I documented how to make the initial setup of python and pytest environment on windows, write the tests using gherkin syntax, implement the page object design pattern and make the selenium webdriver calls on google chrome.
1.1 Thanks
This tutorial was made based on the “Selenium WebDriver with Python” course, administered by Andrew Knight.
He also has a blog, click the link to follow the news, https://automationpanda.com/.
1.2 Prerequisites
This tutorial focuses on test automation, that’s why some previous knowledge in Python and Pytest are necessary.
In case you want to know more about Python and Pytest click the links to see the free courses available.
1.3 Initial Setup
The used text editor in this project is the VS Code (VisualStudio), to download it click the link below.
Next are listed the tools that will be used in the project, during the tutorial will be explained how to correctly install them.
2. Python
2.1 Install Python
Check if your computer already has python installed.
Open the “Command Prompt” and run the command below:
python --versionIf it shows the “python not found” message, then go to https://www.python.org/downloads/ and download the available version:

PS: It is necessary to select the option “Add Python 3.10 to PATH”, so that the installation setup the environment variables:

After Python is installed close and open the “Command Prompt” and run the command below:
python --version
Python successfully installed.
2.2 Install Pipenv
Pipenv was installed together with Python, check it by opening the “Command Prompt” and running the command below:
pipenv --version
Pipenv successfully installed.
PS: In case the “pipenv --version” command shows that the pipenv command it’s not recognized, install it again running the command below:
pip install pipenvIf even after that the problem keeps occurring follow the instructions below.
- Remove your current version of virtualenv: “
pip uninstall virtualenv“ - Remove your current version of pipenv: “
pip uninstall pipenv“ - When you asked proceed (y/n) confirm with y
- Finally, install pipenv and it’s dependencies with the “
pip install pipenv” command.
After it, the “pipenv --version” command must show the pipenv installed version, don’t forget to close and open the “Command Prompt”.
3. Creating the Project
Create a folder with your project’s name.

3.1 Installing a local python environment in the project
It’s important to do it locally so you can manage the dependencies locally.
Open the “Command Prompt” inside the created folder.

Run the command below:
pipenv installAfter running the command inside the folder, open the project through VSCode and open the “PipFile” file that was created by the command.

Inside the file, right below the [packages] parameter declare the tools that will be used in this project (pytest and selenium):
[packages]
pytest = "*"
selenium = "*"
PS: It ‘s important that the [python_version] parameter inside the pipfile is in the same python version installed in your machine.
[requires]
python_version = "3.10"
After saving the project modifications, run the “pipenv install” command in the “Command Prompt” again to install the new added dependencies.
4. Pytest
4.1 Running Pytest
To run the tests, open the “Command Prompt” inside the project folder and run the command below:
pipenv run python -m pytest
4.2 Pytest Conventions
The tests must be located in the “tests” folder inside the project root, following the rule “<project-root>/tests”.
Create the “tests” folder like the example below:

The test files (modules) names must be written in a way that begins with “test_” or that ends with “_test”.
Example: “test_*.py” ou “*_test.py”

Functions must begin with the “test” prefix in their name.
Ex: “def test_basic_duckduckgo_search():”
def test_basic_duckduckgo_search(browser):
5. Selenium WebDriver
Selenium webdriver is a free open source package for automating interactions with a live browser.
Is W3C standard, for more information https://selenium-python.readthedocs.io/.
It’s just a programming package that needs a proxy server to connect with live browsers, for example, it needs chromedriver to connect with google chrome.

5.1 Selenium Webdriver Conventions
Every test should start and end its own webdriver instance, following the premisse: one test, one webdriver, one browser.
Every test case should be different from each other, not sharing resources (shared resources can disturb the tests parallelization).
Always use the webdriver “quit” method, if instead of the “quit” method, the “close” method is used, processes may continue to run and consume machine resources.
5.2 Installing Chromedriver on Windows
In this tutorial we will use the chromedriver (for Chrome), it will be installed in the windows system path, and not inside the project folder as usual in many other projects.
Download the latest stable release of chromedriver from the link below: https://chromedriver.chromium.org/home.
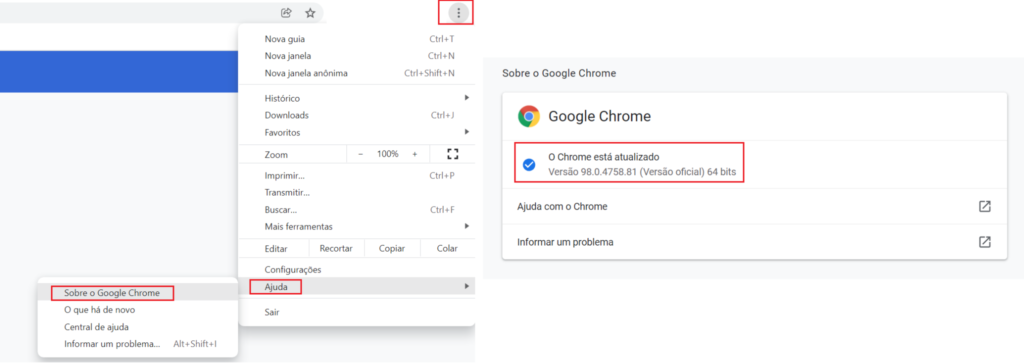
It’s important that the chromedriver have the same chrome version installed in your machine:

Extract the executable in the folder (C:\webdrivers\).
Go the folder path (C:\webdrivers\) through the terminal and type the command below to check if the installed version was the right one:
chromedriver.exe --version
Open the environment variables software.

In system variables select PATH and click edit.
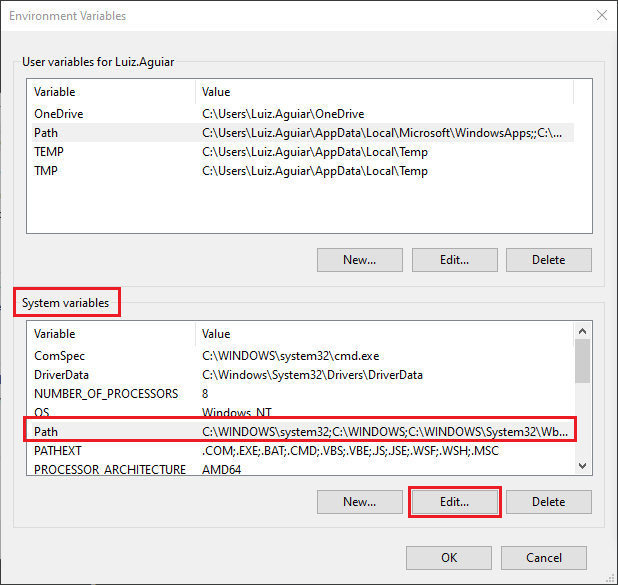
Click NEW and add the folder path where the chromedriver was extracted.

Click OK, open a new “Command Prompt” and type the command:
chromedriver --version

5.3 Installing selenium package for python
Through the “Command Prompt” go to the project folder and run the next command:
pipenv install selenium

6. Fixtures and dependency injection in python
Fixtures are functions that are called before each test, which includes the setup and clean up steps, all inside it’s body.
Create a file with the name “conftest.py” inside the tests folder “<project-root>/tests”.

The next code exemplifies a file structure with a fixture function, the setup steps and clean up that remain encapsulated in it.
"""
This module contains shared fixture.
"""

import pytest
import selenium.webdriver

@pytest.fixture
def browser():

    # Initialize the Chromedriver instance
    b = selenium.webdriver.Chrome()

    # Make its calls wait up 10 seconds for elements to appear
    b.implicitly_wait(10)

    # Return the WebDriver instance for the setup
    yield b

    # Quit the WebDriver instance for the instance
    b.quit
The fixture function is invoked when a test function receives a parameter with the same name of the fixture function.
Therefore, the fixture variables stay visible inside the test.
It’s an elegant way of dependency injection.
def test_basic_duckduckgo_search(browser):
7. Page Objects
Is an object representing a web page or component.
It has locators to find page elements and interaction methods that interact with the page under test.
7.1 Page Objects Conventions
The “pages” folder can stay outside the “tests” folder.
When staying outside of the “tests” folder, the “pages” can be treated as a python package and be imported inside the tests.
Inside the project root create the “pages” folder, inside “pages” create a file called “__init__.py”.

PS: All classes have a function called __init__(), which is always executed when the class is being initiated.
To know more about how __init__ works go to:
https://www.w3schools.com/python/gloss_python_class_init.asp
This __init__.py It will be an empty file 🙂
7.2 Before Page Objects
Before declaring the page objects it is important to remember that the focus is always to test the business rule, always start writing the tests using the gherkin syntax instead of just start coding your automation.
See below the test that we will automate in our project, write it in the “test_search” file.

"""
These tests cover DuckDuckGo searches.
"""

def test_basic_duckduckgo_search():

    # Given the DuckDuckGo home page is displayed
    # When the user searches for "panda"
    # Then the search result title contains "panda"
    # And the search result query is "panda"
    # And the search result links pertain to "panda"

    raise Exception("Incomplete Test")
7.3 Declaring Page Objects
For now we will only code the base structure of the two mapped pages of the site that will be tested (DuckDuckGo).
These pages are search (perform the site searches) and result (the found sites listing).
After coding the structures and learning the page objects concepts we will identify the locators and implement the webdriver calls to manipulate the web elements.
Create the “search.py” and “result.py” files inside the “pages” folder.

search.py
class DuckDuckGoSearchPage:

    def __init__(self, browser):
        self.browser = browser

    def load(self):
        # TODO
        pass

    def search(self):
        # TODO
        Pass
result.py
class DuckDuckGoResultPage:

    def __init__(self, browser):
        self.browser = browser

    def title(self):
        # TODO
        return ""

    def search_input_value(self):
        # TODO
        return ""

    def result_link_titles(self):
        # TODO
        return []
8. Finding Locators for Elements
Elements are basically everything that’s in the web page, can be a button, label or an input text.
Locators are queries that find the elements in the page and return the elements that combine with the query.
Example:

PS: “page title” it’s not a web element, but rather a page attribute.
8.1 Identifying the elements
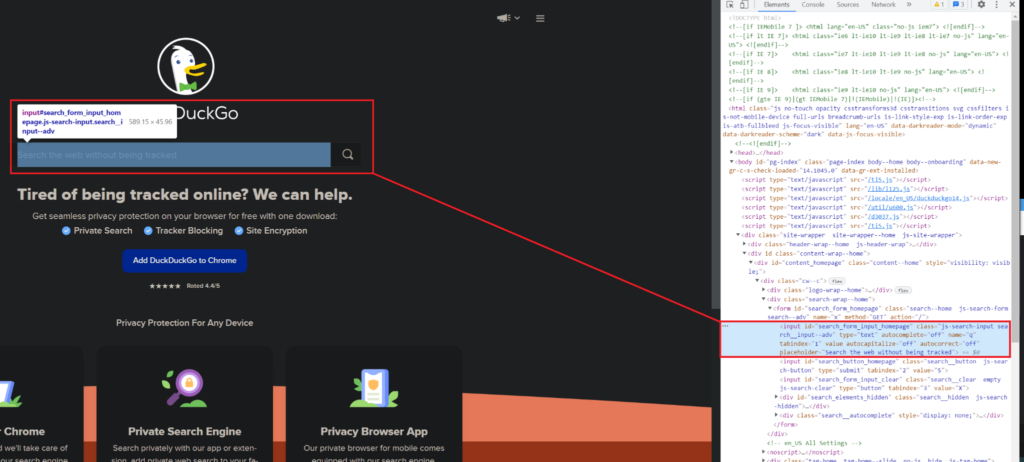
In this example, to identify the web page elements and manage to declare them in your test we will use google chrome.
- Go to www.duckduckgo.com.
- Click the mouse right button over the element you want to identify and select the inspect option.
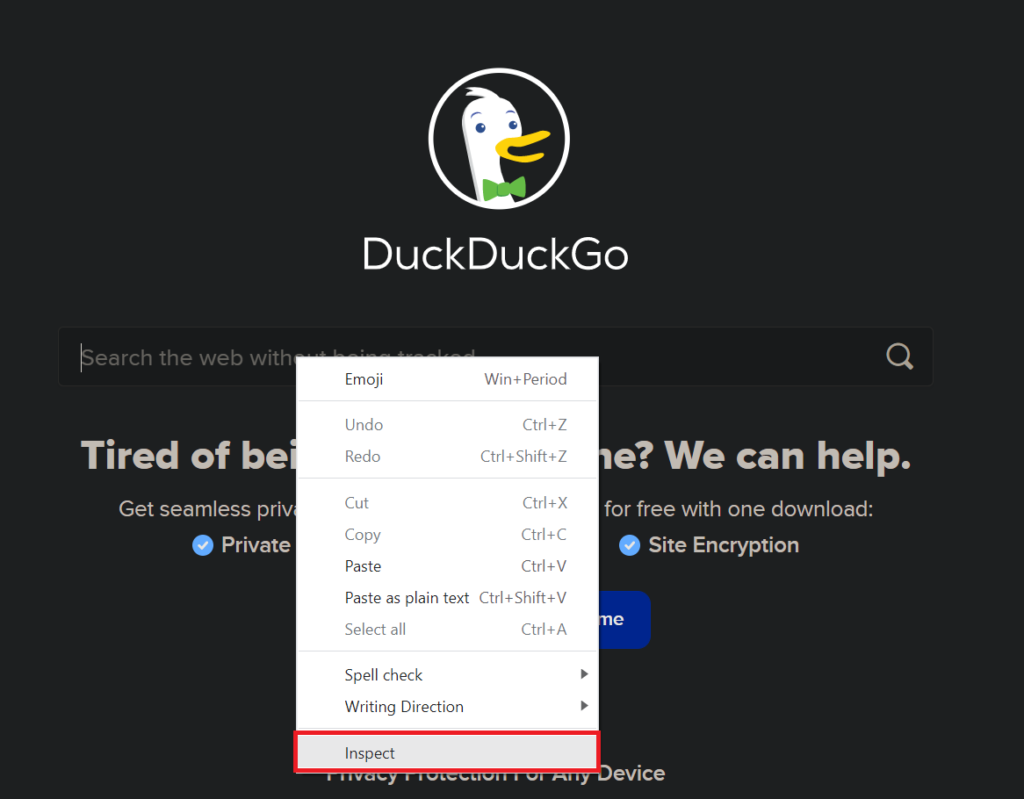
The browser will open the inspect, showing the element attributes, allowing you to select it’s id.
8.2 Locator Structures
A locator structure is divided between two parts, the “locator type” and the “query string”, example, (By.ID, ‘id_do_locator’).
There are many “locator type” that can be used to identify a web element, together with it must be used the “query string” that has the value found in the “element” we want.
Follow some types of “locator type”.
- By.ID
- By.NAME
- By.CLASS_NAME
- By.CSS_SELECTOR
- By.XPATH
- By.LINK_TEXT
- By.PARTIAL_LINK_TEXT
- By.TAG_NAME
8.3 Declaring the locators in python
Declare the locators inside the page objects class, representing their elements.
class DuckDuckGoResultPage:

    RESULT_LINKS = (By.CSS_SELECTOR, 'a.result__a')
    SEARCH_INPUT = (By.ID, 'search_form_input')
9. WebDriver Calls
| For WebDriver: | For Elements: |
| List of calls we can make directly from the web driver instance (named “browser” in our code). | List calls for element objects returned by the “find_element” methods. |
| • current_url • find_element • find_elements • find_element_by_* • get • maximize_window • quit • refresh • save_screenshot • title | • clear • click • find_element* • get_attribute • get_property • is_displayed • location • send_keys • size • text |
| PS: The “text” method from an input type web element returns an empty text, to get the text that was typed it’s necessary to use the “get_attribute(‘value’)” method. |
9.1 Asterisk as an argument on Find Element
The find_element method receives two arguments, the “locator type” and the “query string”, but the “search input” variable is a tuple (with two columns).
The asterisk is used in python to expand the tuples in “positional arguments” that can be passed in the methods.
SEARCH_INPUT = (By.ID, 'search_form_input_homepage')

    def search(self, phrase):
        self.browser.find_element(*self.SEARCH_INPUT)
        pass
9.2 Implement
tests/test_search.py
"""
These tests cover DuckDuckGo searches.
"""

from pages.search import DuckDuckGoSearchPage
from pages.result import DuckDuckGoResultPage

def test_basic_duckduckgo_search(browser):
    search_page = DuckDuckGoSearchPage(browser)
    result_page = DuckDuckGoResultPage(browser)
    PHRASE = "panda"

    # Given the DuckDuckGo home page is displayed
    search_page.load()

    # When the user searches for "panda"
    search_page.search(PHRASE)

    # Then the search result title contains "panda"
    assert PHRASE in result_page.title()

    # And the search result query is "panda"
    assert PHRASE == result_page.search_input_value()

    # And the search result links pertain to "panda"
    # for title in result_page.result_link_titles():
    #     assert PHRASE.lower() in title.lower()

    # raise Exception("Incomplete Test")
PS: The last test validation was commented because the “result” page returned some sites that didn’t have the string “panda” in its title:
pages/search.py
"""
This module contains DuckDuckGoSearchPage,
the page object for the DuckDuckGo search page.
"""

from selenium.webdriver.common.by import By
from selenium.webdriver.common.keys import Keys

class DuckDuckGoSearchPage:

    # URL
    URL = 'https://www.duckduckgo.com'

    # Locators

    SEARCH_INPUT = (By.ID, 'search_form_input_homepage')

    # Initializer

    def __init__(self, browser):
        self.browser = browser

    # Interaction Methods

    def load(self):
        self.browser.get(self.URL)

    def search(self, phrase):
        search_input = self.browser.find_element(*self.SEARCH_INPUT)
        search_input.send_keys(phrase + Keys.RETURN)
pages/result.py
"""
This module contains DuckDuckGoResultPage,
the page object for the DuckDuckGo search result page.
"""

from selenium.webdriver.common.by import By

class DuckDuckGoResultPage:

  # Locators
  SEARCH_INPUT = (By.ID, 'search_form_input')
  RESULT_LINKS = (By.CSS_SELECTOR, 'a.result__a')

  # Initializer

  def __init__(self, browser):
    self.browser = browser

  # Interaction Methods

  def title(self):
    return self.browser.title

  def search_input_value(self):
    search_input = self.browser.find_element(*self.SEARCH_INPUT)
    value = search_input.get_attribute('value')
    return value

  def result_link_titles(self):
    links = self.browser.find_elements(*self.RESULT_LINKS)
    titles = [link.text for link in links]
    return titles
10. Repository
Project repository link:
https://github.com/LuizGustavoR/intro-selenium-py/tree/tutorial/webdriver-with-python
10.1 README.md
It’s a file written in the markdown format, basically this format defines a series of tags to format a text document.
Create a file named “README.md” in your project root.

Below there’s the link of “README.md” in the repository:
https://github.com/LuizGustavoR/intro-selenium-py/blob/tutorial/webdriver-with-python/README.md
10.2 .gitignore
A “.gitignore” file specifies intentionally non tracked files that git should ignore.
Already git tracked files are not affected.
Create a file named “.gitignore” in your project root.

Below there’s the link of “.gitignore” in the repository:
https://github.com/LuizGustavoR/intro-selenium-py/blob/tutorial/webdriver-with-python/.gitignore
11. Conclusion
All steps performed, now just run the tests executing the command below in the prompt.
pipenv run python -m pytest

Success.
Congratulations, the test ran as expected.
11.1 Saved for later
This is a simple tutorial that teaches how to install python and create an automation project from scratch using selenium.
So running it through multiple web browsers, tests in parallel, Integrate it into a CI project or even dockerize it will be saved for another tutorial.
The end.
12. Bibliography
- https://testautomationu.applitools.com/selenium-webdriver-python-tutorial/
- https://www.python.org/
- https://pypi.org/project/pipenv/
- https://stackoverflow.com/questions/46041719/windows-reports-error-when-trying-to-install-package-using-pipenv
- https://selenium-python.readthedocs.io/
- https://chromedriver.chromium.org/home
- https://www.w3schools.com/python/gloss_python_class_init.asp
- https://www.treinaweb.com.br/blog/criando-um-readme-para-seu-perfil-do-github
- https://qastack.com.br/programming/27850222/what-is-gitignore-exactly
- http://git-scm.com/docs/gitignore
